Spread the love

The garage has long evolved from a simple parking stall for dusty vehicles into a true extension of the modern home. Whether you envision a high-end workshop, a seamless family drop-zone, a pristine home gym, or an impeccably curated storage sanctuary, organizing your garage requires a delicate balance of rugged durability and sophisticated interior design. Gone are the days of cluttered corners, tangled extension cords, and chaotic piles of mystery bins. By combining smart spatial planning, multi-functional cabinetry, vertical wall systems, and elevated aesthetic touches, you can turn your garage into one of the most organized and stylish rooms in your house. This comprehensive guide explores twenty unique, Pinterest-friendly smart garage organization decor ideas, complete with architectural breakdowns, material lists, step-by-step creation guides, expert styling tips, and creative variations.

1. Vertical Slatwall Tool Display System

Introduction and Brief

The Vertical Slatwall Tool Display System replaces messy, overcrowded toolboxes with a clean, modular wall-mounted paneling grid. By mounting heavy-duty PVC or aluminum slat panels across your garage wall, you can hang every hammer, wrench, and power tool in neat, visible rows.

What This Idea Means

This concept represents industrial efficiency, visual accessibility, and modern minimalist organization. It transforms tools into functional wall art while keeping floor space completely free of clunky tool chests.

How to Make It

  • Wall Prep: Clear a primary garage wall and locate the wooden studs using a stud finder.
  • Panel Installation: Screw heavy-duty interlocking PVC or aluminum slatwall panels directly into the wall studs, ensuring they are level from end to end.
  • Accessory Attachment: Snap specialized metal hooks, tool holders, and magnetic strips directly into the slat grooves.
  • Arrangement: Group tools by category—placing frequently used screwdrivers at eye level and larger power drills on heavy-duty load-bearing shelves.

Needs to Make That Thing

  • Interlocking PVC or aluminum slatwall panels
  • Stud finder, level, and power drill
  • Assorted slatwall hooks, bins, and tool brackets
  • Screws and mounting hardware

Tips

Outline the silhouettes of your tools directly on the slatwall behind them using subtle decals or chalk to easily spot missing items at a glance.

Variations

  • The Aluminum Commercial Slatwall: Use heavy-grade anodized aluminum inserts for an ultra-sleek, commercial-grade workshop aesthetic.
  • The Wood-Grain Slatwall Finish: Choose PVC panels wrapped in a warm oak or walnut wood-grain finish for a softer, residential look.

2. Industrial Pipe Clothing and Gear Rack

Introduction and Brief

An Industrial Pipe Clothing and Gear Rack brings rugged utility and open-concept style to your garage entryway, offering a sturdy station to hang heavy winter coats, sports gear, and wet outerwear.

What This Idea Means

This concept embodies urban durability, raw material honesty, and convenient transition storage. It bridges the gap between indoor mudrooms and outdoor utility spaces.

How to Make It

  • Material Sourcing: Purchase black iron plumbing pipes, floor flanges, elbows, and threaded rods from a hardware store.
  • Assembly: Screw the pipes together to form a sturdy wall-mounted or ceiling-suspended clothing rail frame.
  • Mounting: Secure the heavy floor flanges directly into wall studs using heavy-duty lag bolts.
  • Styling: Hang sturdy wooden or black metal hangers, and place a low shoe bench or boot tray directly beneath the rack.

Needs to Make That Thing

  • Black iron plumbing pipes and threaded fittings (3/4 inch or 1 inch)
  • Floor flanges and heavy-duty wall lag bolts
  • Power drill and socket wrench
  • Matching wooden coat hangers

Tips

Clean the industrial pipes thoroughly with a degreaser before assembly to remove any manufacturing machine oils that could stain clothing.

Variations

  • The Ceiling-Suspended Pipe Rack: Suspend the clothing rack directly from exposed garage ceiling joists using heavy chains and iron pipes.
  • The Galvanized Steel Variant: Use shiny galvanized steel pipes and fittings instead of black iron for a brighter, moisture-resistant industrial finish.

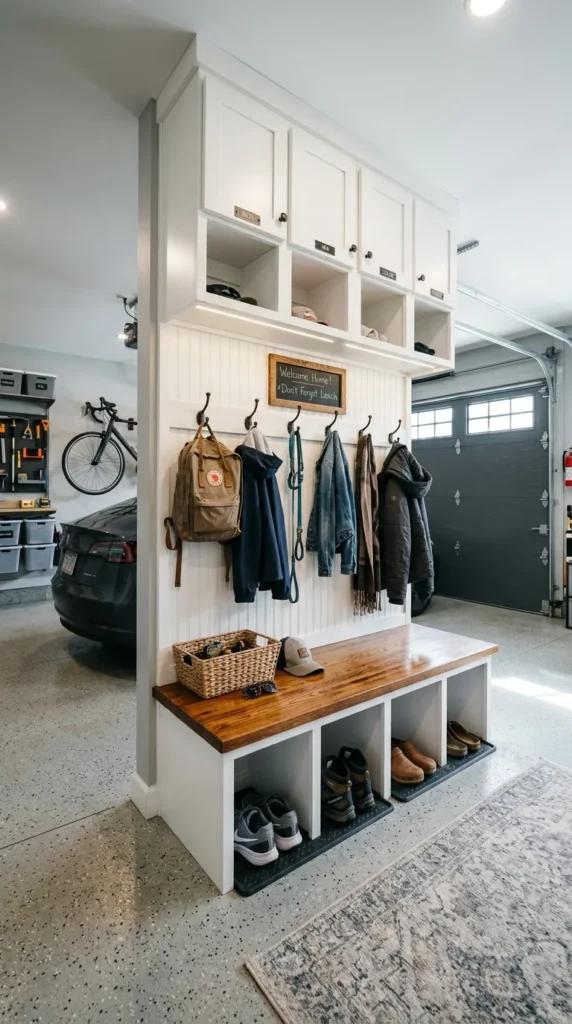
3. Custom Built-In Mudroom Drop Zone Bench

Introduction and Brief

Bringing interior mudroom luxury directly into the garage, this custom built-in drop zone features a sturdy wooden bench seat, individual cubby lockers, and overhead storage cabinets.

What This Idea Means

This concept represents family accountability, structured organization, and welcoming home entry. It provides a dedicated place to sit, remove dirty shoes, and stash backpacks upon arrival.

How to Make It

  • Framework: Build a sturdy structural frame using 2×4 lumber against a clean garage wall.
  • Bench and Cubbies: Attach a thick butcher block bench seat and divide the upper space into individual vertical locker cubbies.
  • Hooks and Hardware: Screw double black coat hooks into each cubby back panel for jackets and bags.
  • Finishing: Paint the cabinetry in a durable satin finish (such as slate gray or crisp white) and seal the butcher block top with polyurethane.

Needs to Make That Thing

  • 2×4 framing lumber and MDF or plywood panels
  • Stained wood butcher block bench top
  • Double coat hooks and cabinet hardware
  • Satin finish paint and wood sealant

Tips

Place pull-out wire baskets or fabric bins underneath the bench seat to corral loose shoes and sports equipment out of sight.

Variations

  • The Enclosed Locker Tower: Add cabinet doors to each individual cubby to completely conceal backpacks and clutter.
  • The Reclaimed Wood Backsplash: Line the back wall of the mudroom cubbies with weathered reclaimed barn wood planks for rustic warmth.

4. Rolling Under-Workbench Storage Carts

Introduction and Brief

Maximizing dead space beneath your workshop tables, these custom rolling under-workbench storage carts tuck away completely out of sight while housing heavy tools, hardware, and supplies.

What This Idea Means

This concept symbolizes spatial optimization, mobile accessibility, and clean surface management. It ensures your workbench stays clear of clutter while keeping supplies within arm’s reach.

How to Make Plywood Carts:

  • Measuring: Measure the exact clearance height and width underneath your existing workbenches.
  • Construction: Build cube-shaped cabinet carts out of sturdy plywood, sizing them to slide smoothly under the table.
  • Casters: Install heavy-duty locking caster wheels on the four bottom corners of each cart.
  • Organization: Add interior shelves, pull-out drawers, or specialized tool holders inside the carts.

Needs to Make That Thing

  • Plywood sheets and wood glue
  • Heavy-duty locking swivel caster wheels
  • Screws, pocket hole jig, and power drill
  • Handles or pulls for the front face

Tips

Use locking casters on all four wheels of each cart so they stay firmly in place while you work at the bench.

Variations

  • The Open-Bin Rolling Cart: Build open multi-tiered shelving carts designed specifically to hold stackable plastic utility bins.
  • The Tilt-Out Waste Cart: Design one rolling cart specifically to house recycling and garbage bins on hidden tracks.

5. Overhead Ceiling Storage Rack Grid

Introduction and Brief

Utilizing the often-neglected vertical volume of your garage, heavy-duty overhead ceiling storage racks suspend seasonal items, bulky storage bins, and luggage safely up and out of the way.

What This Idea Means

This concept represents architectural height utilization, maximum floor clearance, and seasonal rotation management. It turns unused ceiling space into square footage for rarely used items.

How to Make It

  • Stud Location: Locate and mark the ceiling joists overhead using a reliable stud finder.
  • Bracket Mounting: Secure heavy-duty steel ceiling brackets and vertical support posts firmly into the ceiling joists.
  • Grid Assembly: Bolt the metal wire grid platforms across the support frame to create an expansive overhead storage deck.
  • Loading: Store lightweight, labeled plastic bins containing holiday decor and camping gear on the racks using a sturdy ladder.

Needs to Make That Thing

  • Heavy-duty steel overhead storage rack kit
  • Stud finder, socket wrench, and power drill
  • Sturdy extension ladder
  • Clear plastic storage bins with labels

Tips

Never exceed the manufacturer’s maximum weight limit for ceiling racks, and always distribute heavy items evenly across the grid platform.

Variations

  • The Motorized Lift Platform: Install a motorized platform lift that lowers your overhead storage rack down to floor level with the push of a button.
  • The Wooden Beam Ceiling Rack: Build a custom overhead rack using thick timber beams hung with heavy threaded steel rods.

6. Matte Black Pegboard Craft & Hardware Wall

Introduction and Brief

The classic pegboard gets a modern, high-end makeover when painted in a sophisticated matte black finish and framed with natural wood trim, turning screw and nail storage into striking wall decor.

What This Idea Means

This concept combines artisanal craftsmanship with dark, moody interior styling. It proves that utility hardware storage can look incredibly chic and intentional.

How to Make It

  • Pegboard Prep: Purchase a sheet of heavy-duty tempered hardboard pegboard and cut it to your desired wall dimensions.
  • Painting: Spray or roll multiple coats of rich matte black interior paint over the pegboard, ensuring paint doesn’t clog the holes.
  • Framing: Build a clean wooden frame around the perimeter using stained oak or pine boards.
  • Mounting & Styling: Mount the framed pegboard to wall studs using spacers, and insert matte black metal hooks to hang tools, scissors, and small hardware bins.

Needs to Make That Thing

  • Tempered hardboard pegboard sheet
  • Matte black interior paint and primer
  • Oak or pine framing boards
  • Pegboard hooks, wire baskets, and shelf brackets

Tips

Use small magnetic metal cups attached to the pegboard to hold loose screws, washers, and drill bits securely.

Variations

  • The Charcoal Gray Steel Pegboard: Use pre-finished galvanized steel pegboard panels in a sleek dark charcoal finish for ultimate durability.
  • The White Minimalist Pegboard: Keep the pegboard crisp white paired with natural birch wood framing for a bright, clean workshop look.

7. Modular Heavy-Duty Plastic Bin Tower

Introduction and Brief

A Modular Heavy-Duty Plastic Bin Tower organizes loose gear, sports equipment, and auto supplies into uniform, stackable storage bins locked inside a sleek custom vertical wooden framework.

What This Idea Means

This concept represents systematic categorization, dust-free containment, and visual tidiness. It replaces chaotic open shelving with clean, uniform storage columns.

How to Make It

  • Bin Selection: Purchase a set of uniform heavy-duty storage bins with secure latching lids.
  • Tower Framing: Build a vertical wooden shelving tower out of plywood and 2×2 lumber, sizing the shelf heights to fit the bins snugly like drawers.
  • Labeling: Apply bold, professional label stickers to the front of each bin indicating its exact contents.
  • Placement: Position the bin tower against a side garage wall next to your workshop or vehicle parking stall.

Needs to Make That Thing

  • Uniform heavy-duty plastic storage bins with lids
  • Plywood and 2×2 lumber for shelving framework
  • Power drill, screws, and wood glue
  • Label maker or custom vinyl decal labels

Tips

Color-code your storage bins by category (e.g., blue for automotive, green for gardening, yellow for holiday) for instant identification.

Variations

  • The Tilt-Out Bin Tower: Build a specialized wooden cabinet featuring tilting drawer bins that pivot outward for effortless access.
  • The Wire Mesh Basket Tower: Use sliding wire mesh storage drawers instead of plastic bins for superior ventilation of damp gear.

8. Fold-Down Wall-Mounted Workbench Studio

Introduction and Brief

Designed for garages where parking space is at a premium, the Fold-Down Wall-Mounted Workbench Studio locks securely into place when you need a sturdy work surface and folds completely flat against the wall when parked.

What This Idea Means

This concept embodies space-saving engineering, multi-functional adaptability, and minimalist design. It gives you a full-sized workshop table without permanently eating up car parking space.

How to Make It

  • Surface Preparation: Cut a thick butcher block or solid plywood slab to serve as your workbench top.
  • Hinged Brackets: Mount heavy-duty folding steel shelf brackets (rated for hundreds of pounds) securely into the wall studs.
  • Attaching Top: Bolt the wooden workbench top to the folding brackets, ensuring it drops down smoothly and locks securely when raised.
  • Wall Storage Integration: Install a small pegboard or tool shelf directly above the folding workbench that remains accessible whether the table is up or down.

Needs to Make That Thing

  • Thick butcher block or plywood workbench top
  • Heavy-duty locking folding shelf brackets (pair)
  • Stud finder, heavy wood screws, and power drill
  • Clear polyurethane wood finish

Tips

Always check the swing clearance of your car bumper before mounting your fold-down workbench to ensure your vehicle still fits inside the garage when the table is stowed.

Variations

  • The Fold-Down Desk with Storage Cabinet: Build a shallow wall cabinet that houses folding table legs, dropping down to form a complete workstation with interior supply shelves.
  • The Corner Folding Triangle Table: Install a folding triangular corner workbench to utilize awkward garage corners efficiently.

9. Labeled Clear Storage Bin Shelving System

Introduction and Brief

Eliminate the frustrating guessing game of rummaging through opaque boxes with a Labeled Clear Storage Bin Shelving System, featuring heavy-duty wire racks and crystal-clear gasket storage totes.

What This Idea Means

This concept represents absolute visual transparency, systematic order, and rapid retrieval. It ensures you can spot exactly what you are looking for without opening a single lid.

How to Make It

  • Shelving Assembly: Erect heavy-duty commercial chrome wire shelving units along your garage wall, adjusting shelf heights to maximize vertical space.
  • Bin Selection: Invest in uniform crystal-clear plastic storage boxes equipped with airtight rubber gasket latches to keep out dust and humidity.
  • Labeling: Print crisp, uniform labels using a label maker or adhesive vinyl, applying them consistently to the front of every single bin.
  • Arrangement: Place frequently accessed bins on middle shelves and seasonal items on top or bottom tiers.

Needs to Make That Thing

  • Commercial chrome wire shelving units
  • Crystal-clear gasket storage totes in uniform sizes
  • Electronic label maker or custom adhesive labels
  • Step stool for top shelf access

Tips

Place heavy items (like tools or canned goods storage) on the lower shelves and lightweight items (like pillows or blankets) on upper shelves for stability.

Variations

  • The Backlit Open-Shelf System: Install LED strip lights underneath each wire shelf to illuminate the clear bins for a high-end display effect.
  • The Wood-Trimmed Wire Shelving: Encase standard wire shelving units in custom wooden side panels and trim for a built-in custom furniture look.

10. Dedicated Sports Equipment Ball Corral

Introduction and Brief

Tame rolling basketballs, soccer balls, and volleyballs once and for all with a Dedicated Sports Equipment Ball Corral, featuring vertical bungee cords or wooden slat containment bins.

What This Idea Means

This concept symbolizes athletic organization, floor hazard reduction, and family-friendly accessibility. It turns unruly bouncing balls into a neat, easily accessible sports station.

How to Make It

  • Frame Construction: Build an open-front wooden box or vertical frame using 2×2 lumber and plywood base panels.
  • Bungee Cord Wall: Stretch heavy-duty elastic bungee cords vertically across the front opening of the corral, securing them with staples or eye hooks.
  • Retrieval: Simply pull apart the vertical bungee cords to drop balls in or pull them out effortlessly without removing lids.
  • Mounting: Place the ball corral on wheels or mount it directly to a wall stud near your garage exit.

Needs to Make That Thing

  • 2×2 framing lumber and plywood base
  • Heavy-duty elastic bungee cord or shock cord
  • Eye hooks, staples, and fastening hardware
  • Caster wheels (optional)

Tips

Add side hooks to the ball corral frame to hang baseball mitts, tennis rackets, and jump ropes neatly alongside the balls.

Variations

  • The Vertical PVC Ball Locker: Build a tall vertical rack using large PVC pipes cut at angles to hold individual balls stacked vertically.
  • The Wire Mesh Sports Cart: Weld or assemble a rolling metal wire cart designed specifically for athletic gear transport.

11. Wall-Mounted Foldable Bike Storage Racks

Introduction and Brief

Bicycles take up an immense amount of floor space when left sprawling across the garage. Wall-Mounted Foldable Bike Storage Racks lift bikes securely off the floor and fold flat against the wall when not in use.

What This Idea Means

This concept represents floor space reclamation, vertical bike parking, and sleek hardware design. It protects your bicycles from getting bumped by cars while keeping the garage floor wide open.

How to Make It

  • Stud Location: Locate sturdy wall studs at the correct height to hold your bicycles horizontally or vertically.
  • Rack Installation: Bolt heavy-duty rubber-coated bike hooks or folding wall arms firmly into the wall studs.
  • Protection: Ensure the wall mounts feature rubber padding to prevent scratching your bike frames and wheel rims.
  • Folding: When bikes are removed for riding, fold the support arms flat against the wall so they don’t catch on clothing or car doors.

Needs to Make That Thing

  • Heavy-duty foldable wall-mounted bike racks
  • Stud finder, power drill, and heavy wood screws
  • Rubber protective wall guards (optional)

Tips

Store family bikes in height-ordered tiers (adult bikes higher or lower depending on reach) to make grabbing bikes effortless for everyone.

Variations

  • The Ceiling Hoist Bike Pulley System: Use a rope-and-pulley hoist system to raise bikes straight up into the ceiling rafters.
  • The Vertical Wheel-Hook Mount: Hang bikes vertically by their front wheels using slim wall clips that include rear-wheel wall protectors.

12. Magnetic Tool Bar and Hardware Strip

Introduction and Brief

Clearing workbench clutter instantly, Magnetic Tool Bars and Hardware Strips mount flush against garage walls or under cabinets, holding screwdrivers, pliers, and drill bits securely in place via powerful rare-earth magnets.

What This Idea Means

This concept represents tool visibility, instant accessibility, and streamlined magnetic storage. It eliminates rummaging through drawers for frequently used hand tools.

How to Make It

  • Bar Selection: Purchase high-power neodymium magnetic tool bars in your preferred lengths.
  • Wall Placement: Mount the magnetic strips horizontally along your workbench backsplash or slatwall panels, screwing them securely into studs.
  • Arrangement: Snap pliers, screwdrivers, wrenches, and utility knives directly onto the magnetic surface.
  • Hardware Cups: Attach small stainless steel cups to the magnetic strip to hold loose screws, nails, and drill bits.

Needs to Make That Thing

  • Neodymium magnetic tool holder bars (12-inch to 24-inch)
  • Mounting screws and anchors
  • Power drill and level
  • Optional stainless steel hardware cups

Tips

Ensure heavier tools are placed on longer, multi-magnet bars to guarantee they won’t slip or fall off due to vibration.

Variations

  • The Wooden Hidden-Magnet Board: Embed powerful neodymium magnets inside the back of a solid wooden board so tools appear to cling magically to bare wood.
  • The Under-Cabinet Magnetic Strip: Mount magnetic strips underneath wall cabinets to utilize hidden vertical clearance.

13. Epoxy Resin Coated Polished Concrete Floor

Introduction and Brief

Transforming a stained, dusty concrete slab into a pristine, high-gloss showroom floor, an Epoxy Resin Coating seals the garage floor against oil spills, moisture, and wear while elevating the entire room’s aesthetic.

What This Idea Means

This concept represents foundational luxury, chemical resistance, and seamless interior design. It turns the garage floor from a dusty eyesore into a polished reflective surface.

How to Make It

  • Surface Preparation: Thoroughly clean, etch, and degrease the concrete floor using an industrial cleaner and pressure washer.
  • Primer Application: Roll down a specialized concrete primer coat to ensure maximum adhesion.
  • Epoxy Pouring: Mix and pour your multi-component epoxy resin coating, spreading it evenly across the floor with a squeegee and roller.
  • Decorative Flakes: Broadcast decorative vinyl color chips evenly across the wet epoxy for texture and style, then seal with a clear topcoat.

Needs to Make That Thing

  • Industrial concrete cleaner and etching solution
  • Two-part epoxy resin coating kit
  • Decorative vinyl color chips
  • Clear polyurethane topcoat sealer, rollers, and squeegee

Tips

Work in manageable sections when applying epoxy resin, as the mixture has a limited working time before it begins to cure on your roller.

Variations

  • The Metallic Marble Epoxy Floor: Use metallic pigment powders mixed into translucent epoxy to create stunning, swirling marble-like patterns.
  • The Interlocking Garage Tile Floor: Skip liquid epoxy and snap down modular interlocking polymer floor tiles for a fast, grout-free makeover.

14. LED Under-Cabinet Task Lighting System

Introduction and Brief

Eliminating dark shadows over work surfaces, an LED Under-Cabinet Task Lighting System floods your garage workbenches, shelves, and tool stations with crisp, brilliant illumination.

What This Idea Means

This concept represents precision illumination, modern ambiance, and safety. It ensures your workspace is brilliantly lit for detailed mechanical or woodworking tasks.

How to Make It

  • Planning: Measure the length underneath your upper garage cabinets or workshop shelving where task lighting is needed.
  • Light Selection: Purchase linkable LED light bars or flexible waterproof LED strip channels with diffusers.
  • Mounting: Secure the LED channels cleanly underneath the cabinet overhangs using mounting clips or adhesive backing.
  • Wiring: Connect the lights to a discreet wall switch, motion sensor, or remote dimmer control.

Needs to Make That Thing

  • Linkable LED under-cabinet light bars or LED strips
  • Mounting clips, connectors, and power supply
  • Motion sensor or dimmer switch
  • Wire concealment channels

Tips

Choose daylight color temperatures (around 4000K to 5000K) for garage workspaces to ensure accurate color rendering and maximum focus.

Variations

  • The Motion-Activated Cabinet Lighting: Install motion-sensor LED puck lights inside closed cabinets and under shelves so they light up automatically when approached.
  • The Color-Changing RGB Workshop Lights: Add smart RGB LED strips behind workbench trim for customizable mood lighting during evening projects.

15. Weather-Resistant Tall Pantry Cabinets

Introduction and Brief

Concealing household bulk goods, automotive liquids, and gardening supplies behind clean, heavy-duty cabinet doors, Weather-Resistant Tall Pantry Cabinets bring indoor kitchen organization to the garage.

What This Idea Means

This concept represents total clutter concealment, pest protection, and high-end cabinetry styling. It keeps messy supplies hidden from view while protecting them from garage dust and humidity.

How to Make It

  • Cabinet Selection: Source heavy-duty powder-coated steel or moisture-resistant resin tall pantry cabinets.
  • Assembly: Build and level the cabinets against a clean garage wall, securing them to wall studs for safety.
  • Interior Organization: Adjust internal shelves to accommodate tall items like motor oil jugs, car wash buckets, and bulk paper towel packs.
  • Locking Hardware: Install lockable handles on the cabinet doors to keep hazardous chemicals safe from children and pets.

Needs to Make That Thing

  • Heavy-duty steel or resin tall pantry cabinets
  • Level, power drill, and wall anchoring brackets
  • Padlocks or integrated key locks

Tips

Group chemical liquids on lower shelves and paper goods or cleaning supplies on upper shelves to maintain safe, logical balance.

Variations

  • The Wood-Veneer Garage Pantry: Use marine-grade plywood cabinets finished with waterproof wood stain for a luxury architectural kitchen aesthetic.
  • The Rolling Tall Pantry Unit: Install a narrow pull-out pantry tower that slides out from a tight wall gap.

16. Pull-Out Gardening and Potting Station Bench

Introduction and Brief

A dedicated Pull-Out Gardening and Potting Station Bench brings soil, planters, and trowels together in one organized workspace featuring an integrated soil-sifting drop zone.

What This Idea Means

This concept represents hobby-focused organization, tactile convenience, and mess containment. It keeps potting soil contained while keeping gardening tools effortlessly accessible.

How to Make It

  • Bench Construction: Build a durable wooden potting bench with a waterproof metal or zinc table top surface.
  • Soil Drop Cutout: Cut a circular hole in the tabletop and drop a removable stainless steel bucket underneath to catch excess potting soil and debris.
  • Storage Integration: Install lower shelves to hold bags of potting soil, clay pots, and watering cans.
  • Hanging Rools: Mount small tool clips on the side of the bench to hang hand trowels, pruners, and garden twine.

Needs to Make That Thing

  • Potting bench frame with zinc or metal top
  • Removable stainless steel debris bucket
  • Lower storage shelves
  • Side tool hooks and clips

Tips

Line the lower shelf with a rubber drainage mat so wet muddy boots and watering cans won’t rot the wooden framework over time.

Variations

  • The Rolling Potting Cart: Build your potting station on heavy-duty caster wheels so it can be rolled outside into the yard during spring planting.
  • The Vertical Green Wall Potting Station: Combine your potting bench with a living plant wall grid mounted directly behind it.

17. Heavy-Duty Metal Locker Storage Banks

Introduction and Brief

Channeling vintage industrial aesthetics while providing impenetrable security, Heavy-Duty Metal Locker Storage Banks offer rugged individual storage for gear, tools, and heavy equipment.

What This Idea Means

This concept represents industrial heritage, high-security storage, and rugged masculine style. It turns heavy-duty storage into a bold design statement.

How to Make It

  • Sourcing: Purchase commercial-grade steel gym lockers or industrial storage lockers with louvered ventilation doors.
  • Painting: Spray lockers with a fresh coat of durable matte olive green, industrial gray, or vintage navy paint if customization is desired.
  • Anchoring: Bolt the heavy metal locker banks securely to the concrete floor and wall studs to prevent tipping hazards.
  • Interior Setup: Add magnetic shelves, hooks, and battery-operated puck lights inside individual locker compartments.

Needs to Make That Thing

  • Commercial steel storage locker banks
  • Durable spray paint (optional)
  • Floor and wall anchoring hardware
  • Magnetic accessories and interior lights

Tips

Leave locker doors slightly ajar when storing damp gear or athletic pads to allow natural airflow through the louvered vents.

Variations

  • The Distressed Industrial Locker: Sand down the metal edges of vintage lockers to expose raw steel for an authentic reclaimed industrial look.
  • The Mini-Locker Hardware Console: Use short desktop-height metal lockers as a combination workbench base and secure hardware chest.

18. Ceiling-Mounted Pulley Bike & Kayak Hoist

Introduction and Brief

Lifting heavy recreational gear like kayaks, canoes, and bicycles effortlessly up into the ceiling rafters, Ceiling-Mounted Pulley Hoists use mechanical advantage to let one person store heavy items with zero strain.

What This Idea Means

This concept represents mechanical ingenuity, heavy-load elevation, and floor preservation. It stores bulky summer adventure gear safely overhead during the off-season.

How to Make It

  • Joist Mapping: Locate and mark ceiling joists above your parking or storage space.
  • Mounting Brackets: Screw the heavy-duty pulley mounting brackets securely into the wooden ceiling joists.
  • Rope Rigging: Thread the high-strength nylon rope through the pulley mechanism according to the mechanical advantage instructions.
  • Lifting: Hook your kayak or bicycle securely into the padded lift straps, and pull the rope to hoist the gear smoothly up to the ceiling, locking it in place with the safety cleat.

Needs to Make That Thing

  • Ceiling-mounted pulley hoist kit (rated for kayaks/bikes)
  • High-strength nylon hoist rope and locking cleat
  • Stud finder, power drill, and heavy lag bolts
  • Padded lifting straps

Tips

Always tie off the locking cleat securely and double-check the knot before letting go of the hoist rope to prevent accidental drops.

Variations

  • The Motorized Overhead Lift: Install an electric winch-powered hoist system operated via remote control for effortless gear lifting.
  • The Dual-Kayak Overhead Rack: Mount two parallel pulley hoists side-by-side to store multiple watercraft overhead.

19. Multi-Tiered Tire and Rim Storage Rack

Introduction and Brief

Preventing messy tire stacks from eating up valuable floor space, a Multi-Tiered Tire and Rim Storage Rack mounts securely to garage walls or stands as a heavy-duty steel shelf unit dedicated entirely to seasonal tires.

What This Idea Means

This concept represents automotive organization, tire preservation, and vertical safety. It keeps heavy winter and summer tires off the damp floor and neatly organized.

How to Make It

  • Rack Selection: Purchase a heavy-duty steel tubular tire rack designed to mount across wall studs or stand independently.
  • Assembly: Bolt the steel frame together, adjusting the crossbar widths to fit your specific tire sizes (sedan, SUV, or truck tires).
  • Mounting: Anchor the heavy-duty brackets firmly into concrete walls or wooden wall studs using high-capacity lag bolts.
  • Loading: Roll tires onto the adjustable steel tiers, storing them upright to prevent sidewall warping.

Needs to Make That Thing

  • Heavy-duty steel tire storage rack
  • Stud finder or concrete anchor kit
  • Socket wrench and power drill
  • Tire covers (optional for dust protection)

Tips

Clean and condition your seasonal tires before mounting them on the rack so they are fresh and ready for installation when the weather changes.

Variations

  • The Rolling Tire Cart Base: Use a mobile heavy-duty tire rack equipped with large casters so you can wheel your entire tire collection across the garage.
  • The Overhead Tire Loft: Build a high-ceiling steel loft frame specifically engineered to hold heavy tire sets above car hood height.

20. Integrated Recycling and Trash Sorting Center

Introduction and Brief

Streamlining household waste management right at the main entryway, an Integrated Recycling and Trash Sorting Center features pull-out cabinet bins, compost buckets, and sorting slots.

What This Idea Means

This concept represents eco-friendly organization, sanitary waste management, and seamless interior design. It hides unsightly garbage cans inside custom cabinetry while encouraging recycling habits.

How to Make It

  • Cabinet Housing: Build or purchase a durable pull-out waste cabinet frame that matches your other garage storage units.
  • Bin Slides: Install heavy-duty bottom-mount drawer slides equipped with multi-bin waste containers (trash, paper, plastic, compost).
  • Countertop Drop: Cut a small trash drop slot directly into the butcher block countertop above, allowing you to sweep debris straight into the hidden bin below.
  • Labeling: Apply clear recycling icons and labels to each bin lid so family members sort materials correctly.

Needs to Make That Thing

  • Pull-out cabinet waste container hardware kit
  • Multiple color-coded recycling and trash bins
  • Heavy-duty drawer slides and cabinet enclosure
  • Countertop trash drop chute (optional)

Tips

Include a small charcoal odor filter mounted inside the cabinet door to keep organic compost and trash smells neutralized in the garage.

Variations

  • The Tilt-Out Waste Station: Build a stylish wooden cabinet with tilt-out wooden drawer doors that angle bins outward upon opening.
  • The Outdoor-Access Waste Chute: Build your sorting center directly against an exterior garage wall with an outdoor hatch for easy curbside trash bin collection.